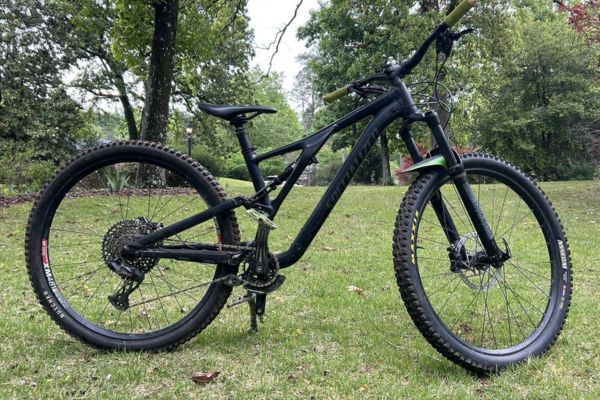
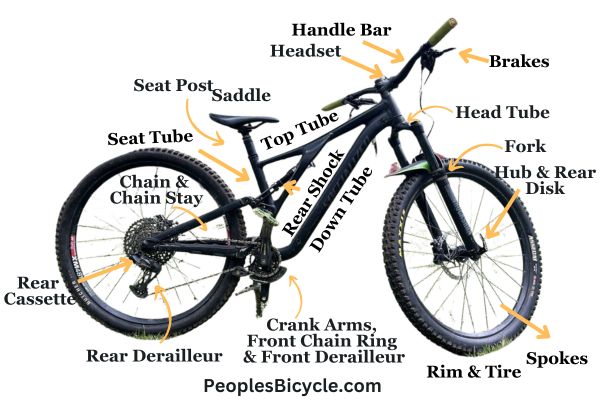
Parts of Mountain Bikes (Complete Anatomy with Illustration)
If you’re an adventurous rider who loves hitting the trails, or even if you prefer cruising on the roads, it’s essential to understand the intricate world of mountain bikes.
A cyclist’s journey involves more than getting fit and learning to ride a bike. It’s vital to understand the different parts of your bike, and with the increasing complexity, things can get confusing.
But worry not, because the information you’ll learn in this article will equip you to understand mountain bikes. We’ll unravel the uses behind the essential parts, providing a comprehensive guide to all the features that make up these incredible machines.
So buckle up and explore the inner workings of your trusty steed. After all, knowing the depths of your bike’s anatomy will only enhance your cycling experience.
Parts of a Bike Frame
Top Tube
Do you know what’s crucial on a mountain bike? It’s a thing called the top tube, also known as the crossbar. Sounds fancy. Well, let me break it down for you. This tube is all horizontal and connects the front part of the bike, called the head tube, to the back part, known as the seat tube. It’s like a straight line running parallel to the ground.
But wait, there’s more! This top tube is like the big boss of the bike’s main triangle. What’s the main triangle, you ask? Well, it’s made up of the top, down, and seat tubes. And guess what? The top tube likes to take the top spot, forming the uppermost part of that triangle.
So, what’s the big deal about this top tube? Well, picture yourself riding that bike, going up and down the trails. That top tube gives you a solid and steady platform to sit and stand on. It’s like your trusty support system. And that’s not all! It also does this super cool thing, spreading your weight evenly across the frame.
Why does that matter? Well, my friend, it’s all about stability and control.
Down Tube
The down tube is like the backbone of the bike’s frame. It connects the lower component of the bike with the top component and provides some additional stability so that the bike does not shake when riding. The down tube runs from the front part, called the head tube, down to the bottom bracket where the pedals are. It’s a straight shot, pointing down toward the ground.
Now, why is this downtube such a big deal? Well, it’s all about strength and stability. This tube supports the whole bike, keeping it solid and sturdy. It’s like a pillar that holds everything together.
So, when you’re out there on the trails, tackling those rocks and roots, you can thank the down tube for keeping your ride smooth and steady.
Head Tube
The head tube is the front part of the bike it is a vital component located at the front of a bicycle frame. It is a short tube connecting the handlebars to the wheel fork. Its key role is accommodating the headset, which enables us to steer the front wheel by manipulating the handlebars.
Seat Tube
The seat tube is the back part of the bike. It is the long tube that extends from below your saddle all the way down to the pedals It’s where you insert the seat post, which goes into the top of the seat tube. Adjusting your saddle height is as simple as raising or lowering the seat post within the seat tube. So, whether you want to find the perfect pedaling position or get a little more room to maneuver on gnarly descents, tweak that seat post, and you’ll be good to go!
Seat Stays Chain Stays
Seat stays are essential components running down the sides of your mountain bike frame. They play a critical role in providing additional strength and stability to the overall structure. Each side of the frame has a seat stay, contributing to the bike’s overall rigidity.
In addition to enhancing the frame’s durability, the seat stays to serve as attachment points for your brakes. Moreover, these versatile stays often offer mounting options for various features and accessories you can add to your bike. From fenders to racks and other customization options, the seat stays offer a convenient and reliable spot for expanding your bike’s capabilities. So, as you hit the trails, remember that these seat stays are not just for show they provide essential support and versatility to enhance your mountain biking experience.
Front of Bike Parts
Headset
The headset is a crucial assembly of components located within the head tube, connecting the bicycle’s frame and wheel fork. Have you ever thought about the mechanism responsible for smoothly turning your bicycle? Well, wonder no more because now you’ll learn that the headset grants this ability.
The headset facilitates steering and allows the bike to turn effortlessly in any direction. Typically, this vital assembly comprises two parts, each equipped with ball bearings that facilitate the bicycle’s steering mechanism. These ball bearings ensure a seamless and responsive steering experience.
Fork
A fork is an essential part of your mountain bike that connects the front wheel to the frame. It’s like the front suspension system of your bike, helping you ride comfortably and safely on rough and uneven terrains. You can better steer the bike with the fork attached to the front wheel.
Without a fork, all the impact and vibrations from these obstacles would directly transfer to your handlebars, making the ride uncomfortable and potentially causing you to lose control.
Stem Handlebars
Handlebars are essential for steering your bike. They come in different widths, rises, and sweeps to suit various riding styles. Flat bars with no rise and little sweep are common for cross-country racing, while trail bikes often have more rise and sweep. Handlebars are typically made of aluminum or carbon and are attached to the frame using a stem. This connects the handlebar to the fork and frame. The stem is the forward extension of the head tube. Selecting the right handlebars and stems is crucial for comfort and control during rides.
Brakes (Front and Rear)
Brakes are a crucial part of your mountain bike that ensures your safety and control while riding. Your bike is equipped with two brakes: the front brake and the rear brake.
The front brake is located on the left side of your handlebar, while the rear brake is on the right side. Releasing the front brake lever engages the brake pads on the front wheel, slowing down or stopping your bike. Similarly, squeezing the rear brake lever applies pressure to the brake pads on the rear wheel, helping you slow down or come to a complete stop.
When using the brakes, applying gradual and controlled pressure is important instead of squeezing them abruptly. That will reduce the bike’s speed and bring it to a complete stop when you need to stop. Several brake options are available:
Hub brakes
Competition-level riding will rarely feature hub brakes. Generally, these brakes were used on city bikes, mainly for cruising around the city. When the rider needs to stop the bike, these brakes force them to pedal backward.
Rim brakes
Most people choose rim brakes over other mainstream brakes because of their affordability. Rim brakes come in three major configurations. These include V-brakes, cantilever brakes, and caliper brakes. Despite the slight differences in design, these brakes do the same thing.
A rim brake works by pinching the wheels and bringing the bike to a halt. Using friction, they can stop the bike effectively by clamping onto the wheels.
Disc brakes
In the same way as rim brakes, disc brakes provide increased stopping power. To prevent the bike from rolling, they pinch the wheels together and create friction.
Brake Levers
Brake levers are handy little levers positioned on the handlebars of your bike, usually connected to a cable inside. When you pull the lever, the cable tightens, activating the brakes.
Depending on the type of bike you’re riding, this cable tension can have different effects. If you have caliper brakes, pulling the lever will clamp the brake pads on the wheel rim, creating friction that slows down the bike. On the other hand, if your bike is equipped with disc brakes, pulling the lever will engage the brake calipers, causing the brake pads to squeeze onto the disc rotor, effectively reducing your speed.
Bike Wheel Parts
Rim
The rim of a mountain bike is the outer circular structure that forms the edge of the wheel. It provides a surface for the tire to rest upon and is usually made of durable materials like aluminum or carbon fiber. The rim’s design and construction significantly determine the bike’s overall weight, strength, and compatibility with different tire sizes.
Spokes
Spokes in a mountain bike are thin metal rods that connect the hub to the rim. They provide structural support, help distribute the rider’s weight evenly, and maintain the wheel’s shape and integrity. The tension in the spokes is crucial for wheel stability and ensuring a smooth and balanced ride.
Hub
The hub in a mountain bike is the central component of the wheel, located at the center of the axle. It contains bearings that allow the wheel to rotate smoothly. The hub also houses the freehub mechanism or cassette, which engages with the chain and enables the bike to shift gears.
Tire
No tire, no trail fire! The tire is a crucial part of your mountain bike, connecting the bike to the road or trail surface. Constructed with a combination of rubber and cloth, the tire features a thicker rubber outer layer for added traction. It fits snugly over an air-filled inner tube, which supports the tire and contributes to the bike’s suspension, providing a smoother ride.
Valve
The valve in a mountain bike is a small, cylindrical component located on the inner tube. It serves as the entry point for inflating and deflating the tire. Common valve types include Presta and Schrader valves, each requiring different pump attachments.
Back of Bike Parts
Pedals
Pedals connect your feet and the bike, allowing you to propel forward. They come in two main types: flat/platform pedals, where you rest your feet on top, and clip-in pedals that require special shoes with cleats to securely attach to the pedal, providing a more efficient power transfer and control. Choose the pedal type that suits your riding style and preferences for an enjoyable biking experience.
Crankset
The crankset is the powerhouse of your bike, where you channel your leg power to drive the rear wheel. It’s made up of chainrings that the chain wraps around and rad crank arms that rock the pedals.
A bike’s chainrings are its front gears. Unlike a multispeed bike, a single-speed bike has a single chain ring. There can be up to three gears on a geared bike.
The crankset connects to the frame through the bottom bracket. It also connects to the rear wheel via the chain, and to you, the rider, through epic pedals. The ultimate link makes your legs and bike merge into one mighty force on the trails!
Bottom Bracket
You can think of the bottom bracket as the heart and soul of your bike, where the crank arms turn the magic. It’s made up of a sturdy spindle that connects to the crankset and smooth bearings that keep everything rolling smoothly. This bad boy slots right into the bottom bracket shell at the base of your frame, keeping things tight and ready to hit the trails with a bang.
Chain
The bike chain is vital in transmitting your legs’ power to the rear wheel. It forms a continuous loop, engaging with the chainrings on the crankset and running along the chainstay. From there, it wraps around the cassette sprockets mounted on the rear wheel. This creates a mechanical connection that propels the bike forward.
Front Derailleur
The front derailleur is a key component responsible for shifting the bike’s chain between different chainrings when changing gears. It facilitates smooth transitions between the chainrings, allowing for efficient gear changes.
It is typically found on bicycles equipped with multiple front gears, enabling riders to adapt to varying terrains and optimize their pedaling cadence.
Rear Derailleur
The rear derailleur is an integral component that enables precise shifting of the bike’s chain between different cogs on the rear wheel’s cassette when changing gears. Working harmoniously with the jockey wheel, the rear derailleur smoothly guides the chain across the cassette, facilitating efficient gear changes. It is exclusively found on geared bikes, as it is crucial in optimizing pedaling efficiency and adapting to varying terrains.
Cassette
The cassette refers to a collection of sprockets or cogs that are mounted onto the rear wheel’s hub. These cogs come in various sizes and serve as the rear gears of the bike. Without multiple gears, a bike without gears will typically have a single cog on the cassette.
Jockey Wheel
The jockey wheel plays a crucial role in maintaining proper chain tension and ensuring smooth movement during gear shifts. However, if your bike is gearless, it is unlikely to feature a jockey wheel unless it is being utilized as a chain tensioner on a single-speed bicycle. The jockey wheel’s presence primarily relates to bikes equipped with multiple gears, as it assists in guiding the chain and optimizing its performance during gear changes.
Bike Seat Parts
Saddle
The saddle is the part of the bike where you sit, and it comes in various shapes and sizes. It attaches to the seat post through saddle rails and a saddle clamp. When riding a mountain bike, you have five points of contact with the bike – the seat, pedals, and handlebars – which help distribute your weight and balance the pressure while riding.
A comfortable saddle is crucial, especially when encountering bumps and rough terrain. Comfort is not the only consideration; the right saddle can also impact your performance. A thinner, performance-oriented saddle may be preferred for road racing and long-distance rides at a high pace. On the other hand, recreational riders often opt for wider, more padded saddles for extra comfort.
Padding in a saddle helps alleviate pressure on the pelvic bones. It prevents discomfort during and after the ride, especially in a more upright riding position like on a hybrid or mountain bike. Endurance road cyclists may prefer thinner saddles as their body position leans forward, distributing weight on the handlebars and pedals rather than the seat.
It’s worth noting that saddles can be designed differently for men and women, considering the different pressure points on the pelvis. Cushioning options can vary, ranging from gel to foam or no cushioning. Ultimately, choosing a saddle that suits your riding style, terrain, and preference is essential to ensure a comfortable and enjoyable mountain biking experience.
Seat Post
The seat post serves as the connection between your saddle and the bike frame. Standard seat posts are of fixed length and can be adjusted by sliding them in and out of the frame.
In contrast, dropper posts are a specialized type of seat post that allows you to change the saddle height while riding. Equipped with a release lever, you can lower the seat to tackle technical downhill features or jumps. When you need the saddle at its full height, you simply push the release lever, allowing the dropper post to extend and lock into place. This feature provides versatility and adaptability to different trail conditions, enhancing your overall mountain biking experience.
Final Thoughts
In brief, understanding the various parts of a mountain bike’s anatomy is crucial for both beginner and experienced riders alike. Each component plays a vital role in the bike’s overall performance, comfort, and functionality. From the headset that enables smooth steering to the pedals that transfer your power to the wheels, every part has its purpose.
By familiarizing yourself with these components, you can make informed decisions regarding bike maintenance, upgrades, or even selecting the right bike for your riding style.
And knowing how each part works together will enhance your riding performance and deepen your appreciation for this incredible machine. Happy trails and safe riding!


![Are Presta Valve Cores Universal? [Only Facts]](https://www.peoplesbicycle.com/wp-content/uploads/2023/10/Are-Presta-Valve-Cores-Universal.png)


One Comment